March-April Motif Composition

Summary

My idea for this project was to create a short and fast paced riff that repeated itself. This was to create a motif that was fast paced and catchy and to make sure it didn’t drag on for too long. I used this online sequencer to create my motif. This sequencer gave me the option to use basically any note out there in any arrangement I wanted. The sequencer also had the bonus of being very easy to use. After I created my composition, I exported as an mp3 file into google drive and linked it to this blog post.

My Motives

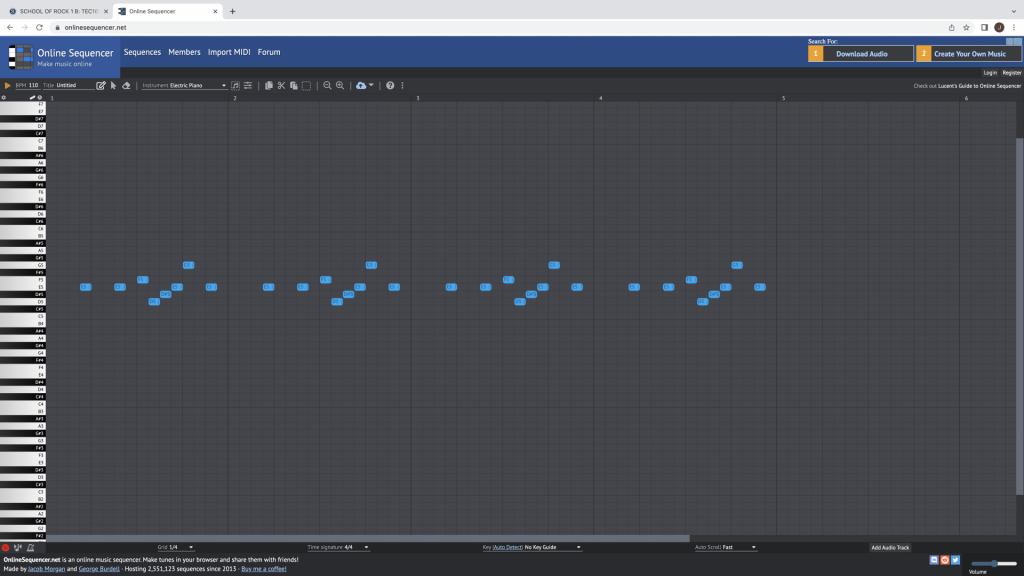
My first motif was made of the E, F, D and G notes on the 5th octave. it plays like this: E5, E5, F5, D5, D#5, E5, G5, E5. I spaced these notes out accordingly to create a riff that I thought sounded pretty good. I then had this riff repeat multiple times to create my motif.

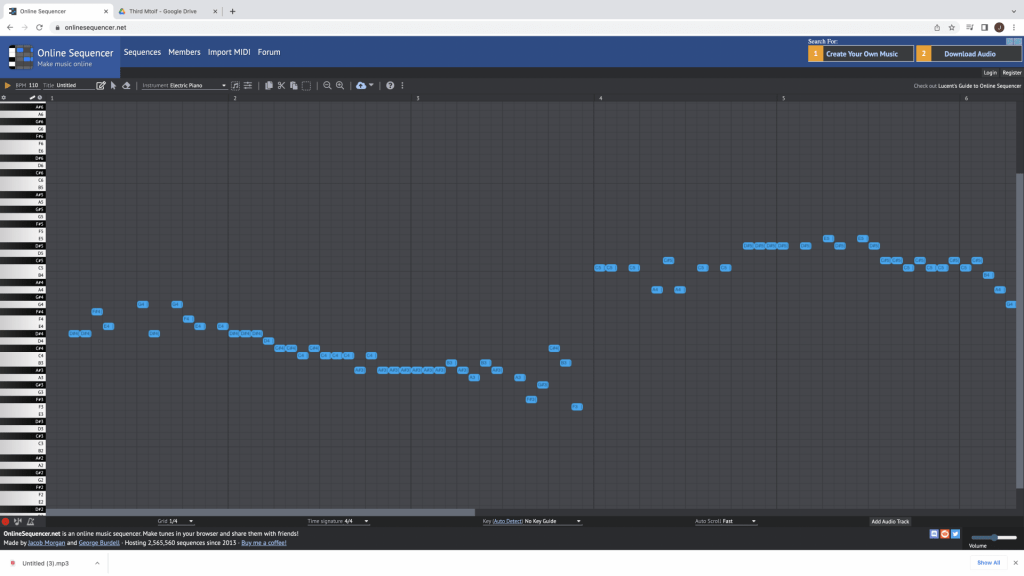
My second motif was me just trying to make a longer riff that repeated itself twice.

My Motif

Second Motif

Third Motif

Feedback

  • Write a few comments from other students or advisory members
  • Cite the person who shared the comment
  • Only use first names

What I Learned & Problems I Solved

What I learned during this project was that a motif doesn’t have to be long and complex. As long as it’s catchy and enjoyable, it can be as short or simple as possible. I also learned that online sequencer is a really good tool, it allowed me to create a motif really quickly and the motif sounded really good. The only problem I had with this project was getting a screenshot. I wasn’t able to figure out how to import it into this blog post. Eventually I figured it out by opening my finder, dragging it onto the desktop, and then importing it into this blog post.

Tutorial

March-April Smart Goal

SUMMARY

Role

Bass Guitar

Intention (SMART Goal)

By April 15th, as part of school of rock, I will have learned how to play Psycho Killer on bass guitar by following this tutorial.

PRE-PRODUCTION – INQUIRY

Leader(s) in the Field / Exemplary Work(s)

The leader is my field is Tina Weymouth. She is the bass guitar player in the Talking Heads and she played the bass guitar riff of “Psycho Killer”, which is the song I am trying to learn to play.

Another leader in my field was John Deacon. He was the bass guitar player for the band “Queen”. My favorite song that he played was “Another One Bites the Dust”.

Training Source(s)

This was a good source for beginners.

0:40: This is when he starts teaching you how to play psycho killer

SMART Goal Schedule

  1. Pick an instrument (5 minutes)
  2. Choose a song to play (15 minutes)
  3. Choose a training source (5-10 minutes)
  4. Write smart goal (1 minute)
  5. Create blog post (20 minutes)
  6. Record beginning evidence (30 minutes)
  7. Upload beginning evidence to blog post (10 minutes)
  8. Practice more bass guitar (45 minutes)
  9. Record ending evidence (10 minutes)
  10. Upload ending evidence to google drive (5 minutes)
  11. Link ending evidence to blog post (5 minutes)
  12. Finish the rest of the blog (20 minutes)

PRODUCTION

SMART Goal Starting Point Evidence

Evidence

SMART Goal Ending Point Evidence

Ending Evidence

POST-PRODUCTION – REFLECTION

21st Century Skills

Ways of Thinking (Creativity, Innovation, Critical Thinking, Problem Solving)

I used a lot of critical thinking during this project. I was able to teach myself to learn bass guitar by using the internet for tutorials and notes to help me learn bass guitar. I also solved the problem of trying to get my amp for the bass guitar to record my bass guitar and nothing else. I just had to select the right input and output in Garage Band while recording.

Ways of Working (Communication & Collaboration)

Even though I did a pretty good job completing this project, there were a few things that I needed help with. When I got stuck when trying to figure out how to tune my bass correctly, I asked for help from one of my teammates and they helped me. Asking others for help has always made me nervous so I think this was good for me.

Tools for Working (Info & Media Literacy)

During this project I used technological skills and tools. I used Garage Band to record myself. I also had to export the recording to Soundtrap so I could cut off the beginning and the end of the recording. After that all I had to do was upload it to my project.

Ways of Living in the World (Life & Career)

This project required me to use skills and techniques that will be very useful later on in life. For example, I made a list of what I needed to do to help me do it faster. This kind of organization will be very useful in the real world.

Reactions to the Final Version

Self-Evaluation of Final Version

Grammar and Spelling

Editor

Microphone Auditions Project

Summary

I recorded my voice with many different microphones and then placed it into soundtrap to create this audition.

Microphone Audition Podcast

My Microphone Project

My Favorite Microphone

Studio Projects C1

The Studio Projects C1 was my favorite microphone because I liked how clear my voice sounded in it. Also if I ever need to buy a microphone, I will choose this one because the cost to quality ratio is so good.

  • The C1 is a large cardioid, large-diaphragm condenser microphone
  • Compares with professional microphones costing 10 times more
  • Good for many recording situations including voice, instruments, etc.

Terms and Concepts

  •  Microphones
    • Dynamic – The sound waves themselves create the electrical signal by moving the membrane diaphragm of the microphone. Very popular and very well known. It is good for the low and middle range, NOT the high range.
    • Condenser – The membrane has an electrical current that waits for sound. When the sound waves hit it, it responds instantly. They are all over the place, but they need an electrical charge {amplifier} from something {battery}.
  • Polar Patterns
    • Omni – Picks sound up from all directions equally. This is used for interviews because it can pick up more than one person, without having to have two separate mics.
    • Cardioid – Picks up one half of the microphone, also known as a ‘directional mic’. Most sensitive in the front, about 180 degrees. Shaped like a heart.
    • Bi-directional – ‘Figure of 8’, picks the front and behind of the mic, but the 90-degree angle on both sides does not get picked up.
  • Transduction – Converts one form of energy to another.
  • Voltage – An electric force or a potential difference shown in volts.
  • Phantom Power – Activates the condenser in a microphone. DC powered mostly between 12 and 48 DC voltages.
  • Sensitivity – Voltage at its known sound level. Can be called by its voltage or decibels. A higher number means more sensitivity, everything is mostly in negatives. Sound pressure.
  • Frequency Response – The range of sound the microphone can produce and how sensitive it is within the range. You want it nice and flat.
  • Transient – A variation in current, voltage, or frequency.
  • Placement – Placement of the microphone is key, depending on the sounds you want, it can just be the distance from you or the instrument from the microphone. This part of the microphone can affect others emotionally in a way to connect with the audience.
  • Proximity Effect – Decreased sensitivity to low mics, which reduces background noise and vibration and counteracts when used very close to the source.
  • Output – A place where the sound leaves the system.
  • Characteristics – This is the Relative Response and Frequency measured in a Hertz graph to show how good or bad the microphone is. This can show the quality of the mic.
  • Noise Rating – The signal (sound source) to noise ratio measured in decibels (dB). Noise is any sound in the background you don’t want. Electricity vibrates at 60dB so you want the ratio of the signal and noise to be higher than that. Preferably 90dB or higher.
  • Hardware
    • Clips – A clip is something that you use to hold a microphone on something {for example – stand }, but, using the wrong kind of clips can affect the performance, make sure it is tight so it has the correct effect.
    • Stands – This ties in with a clip, this is what the clip will connect to. This keeps the microphone towards the object you want to hear without having to hold it or keep it still.
    • Windscreen – Something that covers and protects the microphone, mostly a foamy material.
    • Direct Box – A device used to connect an instrument directly into the audio mixer.

What I Learned and Problems I Solved

What I learned in this project is that the type of microphone you use matters a lot. I used to think that there wasn’t much difference between all microphones besides quality, but now i know that there is a huge difference. Some microphones are better for drums, some are better for guitars, some are better for podcasts and some are better for talking in front of a crowd. I also learned how to make podcasts in soundtrap.

I did run into a problem. This problem was learning how to turn my recordings into a podcast in sound trap. I solved this by following Leduc’s instructions. His instructions told me that there were podcast tutorials in sound trap and that they would teach me how to make a podcast. I followed a tutorial in sound trap and it completely taught me how to make the podcast. Problem solved!